A Practical Guide to Running Image Segmentation Experiments on Mechanical Turk
Benjamin Bauchwitz, Duke University
Part 1: Introduction
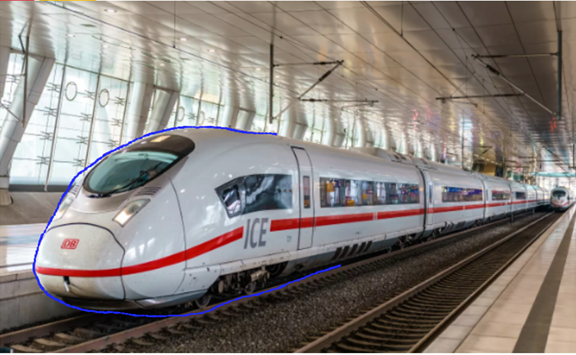
Image segmentation is a set of powerful computer vision processes in which images are divided into semantically meaningful regions. Different types of image segmentation are used to divide the image in different ways. For example, in semantic segmentation, each pixel is assigned a label as belonging to a particular class. In instance segmentation, the boundary of each important object is marked. Figure 1 illustrates the segmentation of an image with an airplane.
Figure 1: Image segmentation example
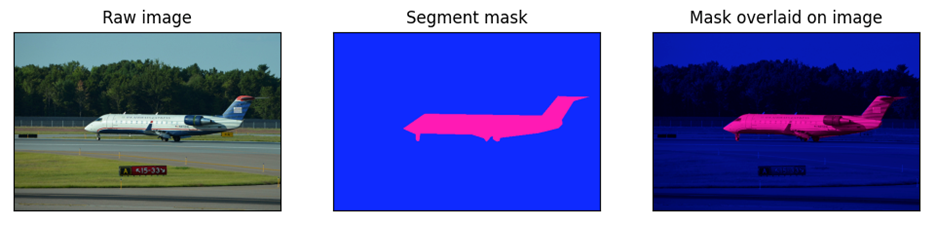
Image segmentation has many industrial applications, such as evaluating pathology in medical radiography images, identifying hazards in front of an autonomous vehicle, or authenticating mobile device logins through face recognition. It is also a data hungry procedure, as image segmentation software often relies on convolutional neural networks, which can require many thousands of example training images to work effectively. As a result, computer vision researchers frequently run experiments to explore new ways of generating training data with high quality and low cost. For example, one experiment might ask labelers of different ages to annotate the same images to see if certain age labelers produce the best results. A different experiment might ask labelers to annotate the same images with a variety of different drawing tools to see if certain tools result in the best quality annotations.
In this tutorial, I provide a practical guide on running image segmentation experiments using mturk-segmentation-toolkit [https://github.com/bbauchwitz55/mturk-segmentation-toolkit], an opensource platform for running customized image segmentation tasks on Amazon Mechanical Turk. Amazon Mechanical Turk is a web platform for crowdsourcing jobs to workers around the world, and it is frequently used to distribute images for anonymous workers to label. It comes with some built-in tools for image segmentation, though they limit the ability for experimenters to customize the annotation user interface, supply partially pre-labeled images, or extract rich user interaction data. Researchers may desire functionality in these areas to explore new research questions in human factors and machine-assisted image segmentation.
Part 2: Installing the code
First, clone the mturk-segmentation-toolkit GitHub repository. In the command line, you can use the following commands:
git clone https://github.com/bbauchwitz55/mturk-segmentation-toolkit.git
You can also use GitHub Desktop or any GitHub plugin available in your preferred development environment. I recommend using PyCharm to interact with the Python tools available.
Once you have cloned the GitHub repo, set up your Python development environment and the required dependencies. It’s recommended to install Python 3.7 to ensure compatibility. Then, to install the required Python dependencies, locate the requirements.txt file present in the mturk-segmentation-toolkit directory. You can install each dependency listed in the file manually via your preferred package manager, or, if you have pip, type the following in the command line:
pip install -r requirements.txt
Part 3: Overview of the mturk-segmentation-toolkit annotation app
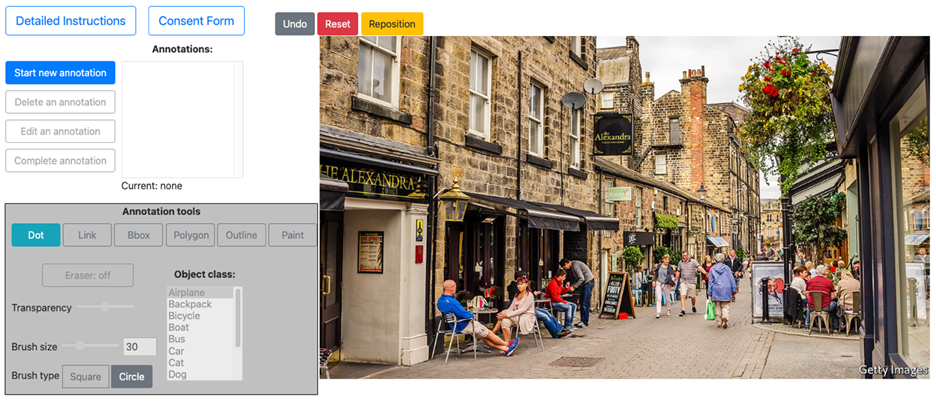
The image segmentation app (Figure 2) is based on opensource code by Yanfeng Liu, Jay Carlson, Eric Psota, and Lance Perez. The app presents an image and a set of tools for putting image segmentation annotations on that image. At the top left are tools for managing the individual objects annotated within an image. The labeler can start annotating a new object, select an object to edit or delete, or mark an annotation as complete.
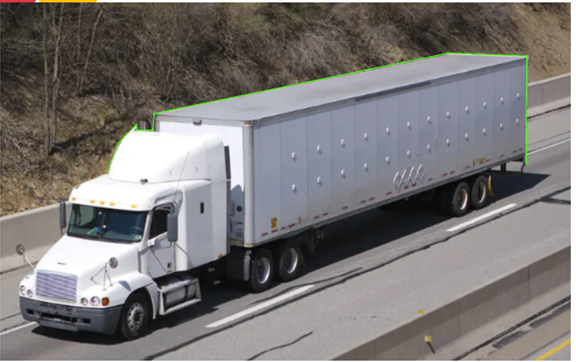
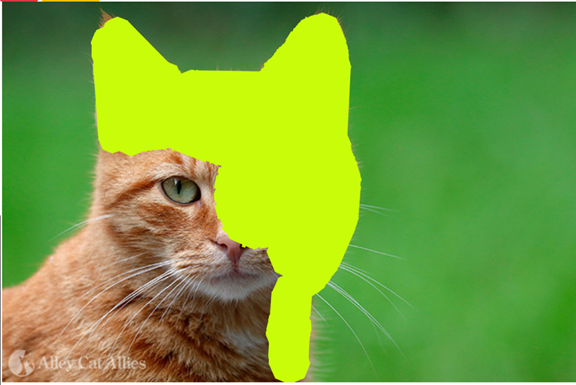
At the bottom left are tools for drawing the annotation. The labeler can select different methods for drawing the annotation, such as a polygon tool (Figure 3), a freeform outline tool (Figure 4), or a paintbrush (Figure 5). They can 1) select which object class that annotation will be labeled as; 2) erase parts of an annotation if they made a mistake; and 3) control the transparency for visualizing completed annotations. Additionally, for the paintbrush tool they can control the size and shape of the paintbrush.
The app also supports moving or resizing the image and has a robust keyboard interface to efficiently select commands without having to click within the interface. In theory, a labeler can complete all actions except for drawing the annotation itself using only a keyboard.
The system is highly customizable, enabling these different functions to be turned on or off for different annotation tasks. For example, experimenters can restrict the app to only allow the paintbrush tool, can turn off the keyboard interface, can change the object class options that are displayed, or can manipulate the instructional text that is available at the top of the page. It is also possible to run tasks where the image comes with pre-uploaded annotations, and the labeler is responsible for modifying or extending those rather than creating new annotations entirely from scratch. The software also readily supports displaying informed consent forms, which are usually required for federally-funded human subjects research.
To be useful as an experimentation platform, the app also produces rich output data. First, every annotation that the labeler creates is saved as a JSON text object that can be downloaded with the rest of the Mechanical Turk output data. Second, every interaction with the user interface (e.g., button clicks, mouse movements, tool selection) are recorded in a detailed interaction log, which is also automatically downloaded at the conclusion of the task. In this way, researchers can evaluate not just the annotations themselves, but also the behavior patterns of the labelers who created them.
Part 4: Setting up the app on the Mechanical Turk web interface
Amazon Mechanical Turk enables researchers to post web tasks and crowdsource them to users around the world. It is a popular platform for image segmentation researchers, as they can post large numbers of images to be annotated by many paid labelers working in parallel. The mturk-segmentation-toolkit JavaScript segmentation app can be pasted directly into the Mechanical Turk task template, enabling experiments to be run with little programming expertise.
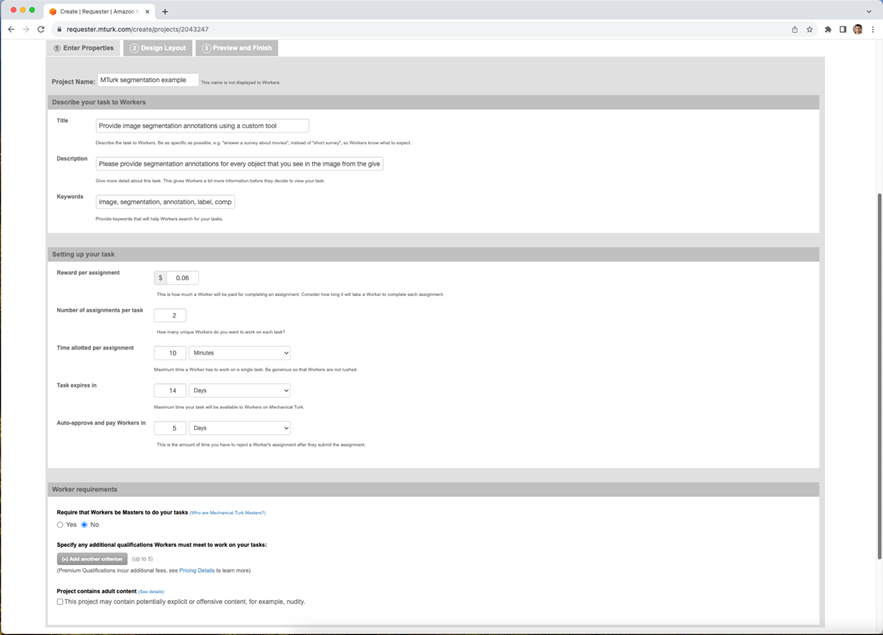
To create a new batch of image segmentation tasks on Mechanical Turk, log into the Mechanical Turk requester user interface, navigate to the ‘create’ tab, and select ‘New Project’. On the first page you’ll be able to enter basic properties of your task, such as the title and description shown to workers, the amount of money they’ll be offered for completing each image, how much time they have to annotate, and how long the task will be available on the Mechanical Turk website for workers to sign up (Figure 6). You can also apply qualification restrictions, where only workers with certain qualifications will be eligible to complete the task. It is usually recommended to restrict segmentation tasks to workers with a significant track record of past approvals. The organization sponsoring your research may also require additional restrictions, such as limiting participation to only workers from a particular country, with a particular education background, or who speak a particular language.
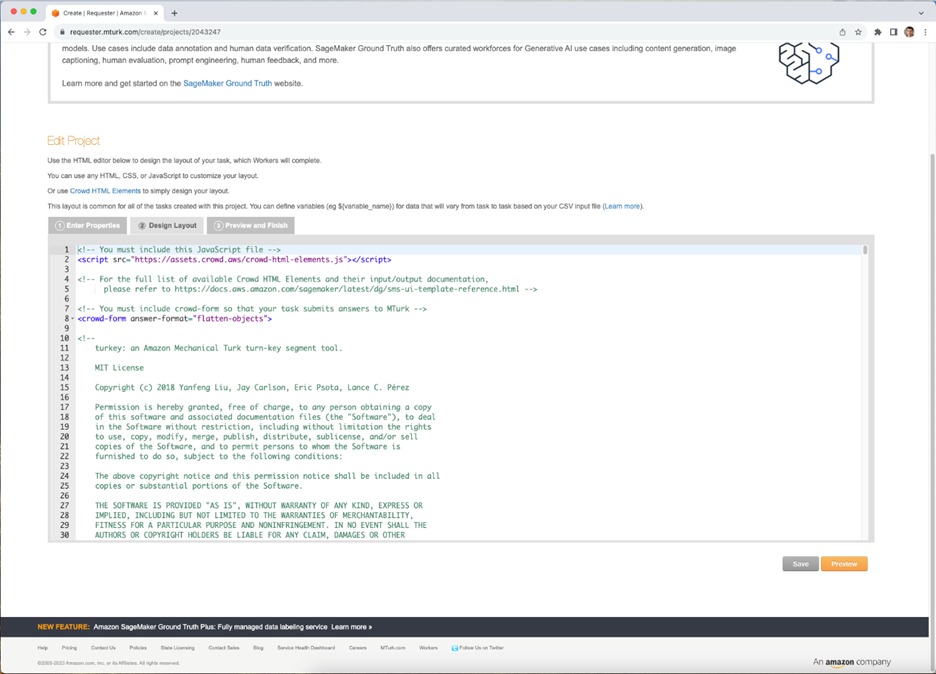
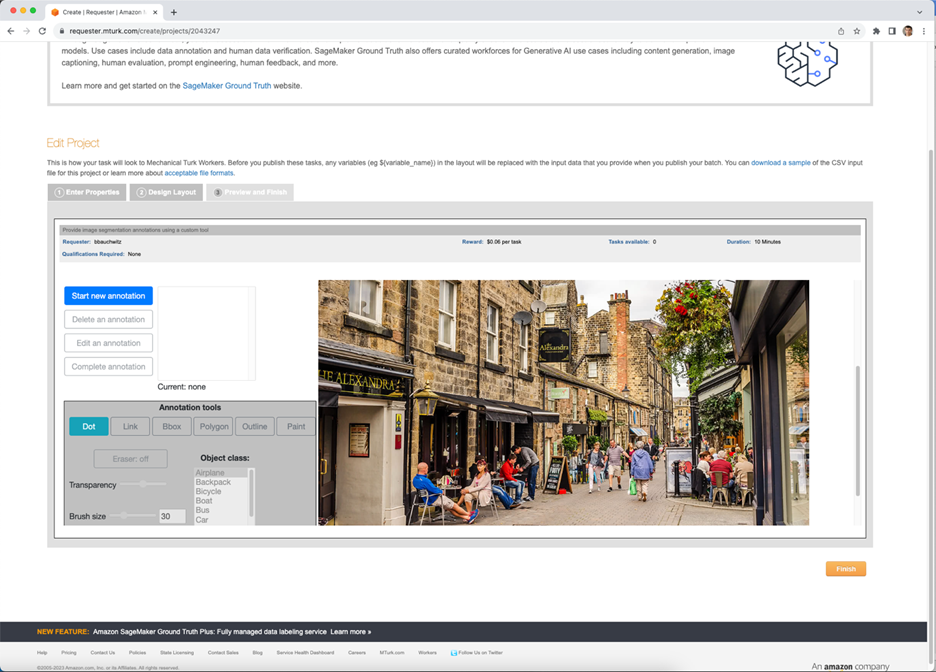
After you click the ‘Design Layout’ button at the bottom of the page, you’ll be able to enter the mturk-segmentation-toolkit code (Figure 7). Here you should copy the entire contents of the MTurkStudy.html file and past it inside the crowd-form element in the existing code template on the page. In other words, all of the app code should go after the line <crowd-form answer-format="flatten-objects"> and before the line </crowd-form>.
When you click ‘Preview’, you’ll be brought to a final page where you can test out the app (Figure 8). The app should be fully functional on this page, though no data will actually be stored. The app will show a default image, though you’ll be able to override this later with task specific images.
It is important to be aware of limitations with the Mechanical Turk web user interface. Tasks posted this way, instead of with Amazon’s Python API, may have restricted height and may require the labeler to scroll up and down, depending on the size of their screen and the height of the image. Certain properties of Mechanical Turk tasks, such as the frame height, can only be manipulated when the task is uploaded via the Python tools. If you are planning to experiment with particularly large or complex images, it may be advantageous to always configure tasks programmatically so that you have maximum control over the height of the screen.
The next step is to create the data for configuring each individual task in an experiment batch. A batch is a set of tasks that are uploaded together on Mechanical Turk. Many different labelers can work on tasks from the same batch in parallel.
Usually, the goal is to have labelers annotate many images, not just a single one. You may also want different labelers to have different drawing tools available or different objects they are responsible to label. To do this, create a .csv file with four columns: ‘img_url’, ‘annotations’, ‘annotation_mode’, and ‘classes’ (example shown in Table 1). Each line in the csv file will correspond with one task out of the entire batch to be posted (note that batches are limited to 500 tasks on the Mechanical Turk website, so you may need to publish multiple batches if you have more images than that).

The ‘img_url’ field should reference the web address where the image is stored. The image must be available online, it cannot be stored locally on the computer. Keep in mind that some browsers restrict cross-domain data transfer, meaning that images stored on some domains may cause unexpected behavior, possibly breaking some of the annotation tools. The safest method to avoid this is to store all of your images on an Amazon Web Services server, such as S3, which will ensure that they are loaded from the same domain as labeling app.
The ‘annotation’ field specifies a set of pre-existing annotations the labeler can modify. You can leave this field blank if you want the labeler to create new labels from scratch. To provide a pre-annotation, specify the annotation(s) in the same JSON format that annotation results from the app are output in. (For reference, the JSON schema is available in the MTurkStudy.html file).
Finally, ‘annotation_mode’ and ‘classes’ fields in specify the list of which drawing tools and classes are available in the user interface. These should be lists of words separated with a ‘-‘. The list for ‘classes’ can have any class names you want. The list for ‘annotation_mode’ should reference the unique name of each labeling tool available in the app: ‘dot’, ‘link’, ‘bbox’, ‘polygon’, ‘outline’ and ‘paint’.
When you have a .csv file with all of your task data, you are ready to publish the batch! On the Mechanical Turk web interface, navigate to the ‘Create’ page, click ‘New Batch with an Existing Project’, and choose the project where you just added the segmentation app code. Click the ‘Publish Batch’ button, and upload the .csv file. You will be able to preview the tasks with the images you uploaded to ensure they work correctly. When you are ready, confirm the batch and all of the images will be posted for workers to annotate.
You can review the status of tasks you posted by navigating to the ‘Manage’ tab and selecting ‘Results’. Here, the batch you posted will be visible, showing how many of the tasks have been completed vs. how many are still open. You can click ‘Review Results’ at the top right of the batch overview to download a csv file containing the result data.
Part 5: Using the mturksegutils Python tools to run experiments
The Amazon Mechanical Turk web user interface has limitations which may make it difficult to work with large batches of images. Batches are limited to only 500 tasks, so if you have a very large number of images to label, this process can be cumbersome.
Additionally, downloading the results directly from the user interface can introduce problems if the annotations the workers provide are particularly complex. The Mechanical Turk web interface saves results directly to .csv files, though each line in these files has a character limit. When the annotation data is very complex and many points are annotated, the output data can be truncated or broken across lines, creating significant challenges to working with the data later. If you expect your annotations will be complex, using Python tools to manage results can ensure that they don’t become corrupted.
Finally, Amazon does not have built in tooling to visualize the annotations your workers create, which can make it challenging to assess if they completed the task correctly and are entitled to payment. mturk-segmentation-toolkit contains a review app that can be used to quickly visualize results and approve or reject them. It also provides features for managing qualifications and training tasks, so that you can filter participants based on how they performed on training tasks or early batches.
Setting up an experiment database
There are two Python packages within mturk-segmentation-toolkit: mturksegutils, which contains functions for setting up and managing experiments, and mturksegreview which is a Flask applet for visualizing results, approving or rejecting them, and assigning workers qualifications.
The mturksegutils package has numerous tools to simplify running Mechanical Turk segmentation experiments. First, it provides support for databases to manage the posted tasks, workers, qualifications, and experiment cohorts. The database_builder submodule can be used to set up the database, and the database_initialize module can be used to add experiment and task records.
To set up the database, first you will need to specify a path where that database is to be stored. Locate the file mturk_seg_vars.py and fill in a value for the variable db_path specifying the path where your database will be created and filename you’d like the database to have. Once you’ve assigned the database path, the process for setting up the database is straightforward. Below shows example code for using mturksegutils to construct the database:
Code sample 1: constructing an experiment database
from mturksegutils import mturk_seg_vars, database_builder,
database_path = mturk_seg_vars.db_path
exp_group_config_file = "/path/to/exp_group_config.csv"
task_config_files = [
    "/path/to/task_config_1.csv",
    "/path/to/task_config_2.csv",
    "/path/to/task_config_3.csv"
    "/path/to/task_config_4.csv"
]
# For storing the experiment group and task level configurations
database_builder.create_exp_groups_table()
database_builder.create_task_config_table()# For storing results later
database_builder.create_hits_table()# Optional, if your experiment will use training tasks
database_builder.create_training_task_table()
Next, to initialize the database with experiment configuration data, you will need .csv files specifying the overall parameters for each experiment group and then the individual image-level data that will be presented within each experiment group. An example .csv file for configuring experiment groups can look like Table 2.
Table 2: Example experiment configuration csv data
| exp_group | mturk_type | num_objects | reward_size | time_limit |
| cohort_1 | production | 3 | 0.06 | FALSE |
| cohort_2 | production | 3 | 0.08 | FALSE |
| cohort_3 | production | 4 | 0.06 | FALSE |
| cohort_4 | production | 4 | 0.08 | FALSE |
For each experiment group, you will need a .csv file dictating how each annotation task is presented (e.g., which image is shown, which tools are available, etc.). These .csv files should look like Table 3.
Table 3: Example task configuration csv data

When you have all of these configuration data files prepared, you can set up and initialize the database for tracking experiment data. Here is example Python code for how to achieve this:
Code sample 2: adding experiment and task configuration data to the experiment database
from mturksegutils import mturk_seg_vars, database_initializer
import sqlite3
import csv   # Open a connection to the newly created database
conn = sqlite3.connect(database_path)
cursor = conn.cursor()

# Read each line of the exo_group_config_file and add to the table
with open(exp_group_config_file, 'r') as csv_file:
    csv_reader = csv.reader(csv_file)
    header = True
    for row in csv_reader:
        if header:
            header = False
            continue

        # Insert the experiment group configuration into the exp_groups table
        database_initializer.insert_exp_group_into_table(conn, cursor, row)

# Add the data from each task config file to the database
for task_config_file in task_config_files:
    database_initializer.insert_task_config_into_table(conn, cursor, task_config_file)

# Close the database connection
conn.close()
Managing worker qualifications
Usually, you will want to restrict access to your experiment tasks to a limited subset of Mechanical Turk workers. To do so, you will need to apply a qualification requirement to any task you want to restrict. Then, workers who demonstrate that meet your requirements can be assigned a qualification score and will become eligible for your tasks.
The mturksegutils Python package has tools for managing qualifications that might be commonly used in image segmentation experiments. In particular, you can designate workers as having completed an informed consent or other pre-screening assessment, give them numeric scores indicating skill level or assigned cohort, or invite specific workers to complete tasks on an individual basis.
mturksegutils supports three different qualification types out of the box, though it is easy to add additional qualifications to support the needs of your experiment. The three default quals can be used in combination to provide significant control over participant assignment to experiment conditions. The three qualification types are labeled in the codebase as main_seg_qual_name, any_object_count_qual_name, and invite_only_qual_name.
main_seg_qual_name is intended to indicate that workers have completed the consent form and screening task. Different integer values can be assigned to this qual, once a worker has it, to assign them to different experiment cohorts.
any_object_count_qual_name is intended to indicate something about a worker’s skill, which usually manifests as the number of objects per image that they typically label successfully. This qual can be used to restrict harder images (e.g., those with more objects) to workers with higher levels of skill.
invite_only_qual_name is intended to be applied to workers on a temporary basis, giving them priority access to tasks. This is helpful if a worker is enrolling in the study late and needs to catch up on screening or training tasks, or if you want to enroll a specific worker and don’t want them to have to compete for those screening or training tasks.
First, to configure qualifications, create the three or more qualifications you which to use in Mechanical Turk, using the web interface or the Mechanical Turk Python tools. This is an easy process, and the Mechanical Turk documentation describes how to do it. Then, for each qualification type listed in mturk_seg_vars.py, fill in the name that you used when creating that qual on Mechanical Turk.
mturk-segmentation-toolkit codebase has an existing experiment screening task that can be used to induct workers into your experiment. It is contained in the file vocabQualification.html, which like the segmentation app is a self-contained Mechanical Turk app that can be directly pasted into the Mechanical Turk code template. This screening task includes a consent form and English vocabulary quiz, which can be used to quickly screen workers for language proficiency. The steps to running this screening task on Mechanical Turk are identical to the steps for running the segmentation app, as shown above.
When you run a screening task, Mechanical Turk will generate a .csv file containing the results of that task. This will indicate how many workers accepted the consent form and the scores they got on the vocab quiz. To efficiently enroll workers in the study, you can invoke the following Python code:
Code sample 3: enrolling a cohort of screened participants
from mturksegutils import worker_quals, mturk_client

screening_results = "/path/to/results/from/screening/task.csv"
mturk = mturk_client.create_mturk_instance()

worker_quals.assign_qualifications_to_consent_and_vocab_batch(mturk, screening_results)
This code will assign a score of 1 for the main qualification for all workers who have submitted the consent form and achieved a passing score on the vocab quiz. You can manipulate the passing score threshold within mturk_seg_vars.py by setting the value of ‘vocab_score_requirement’.
Once all workers have some score for the main qualification, you will want to assign different values to move some of them into different cohorts or give them priority for certain tasks, such as those requiring additional skill. The following Python code illustrates how to use mturksegutils within your own Python scripts to assign different qualifications to workers based on criteria appropriate to your experiment. In this example, we will simply assign a new value to the main segmentation qual, moving the specified worker to a new cohort.
Code sample 4: assigning qualifications to individual workers
from mturksegutils import mturk_seg_vars, worker_quals, mturk_client


mturk = mturk_client.create_mturk_instance()

qual1 = mturk_seg_vars.main_seg_qual_name
qual2 = mturk_seg_vars.any_object_count_qual_name
qual3 = mturk_seg_vars.invite_only_qual_name
# In this example, we'll assign the worker to cohort 3
cohort_qual_id = worker_quals.get_qual_id(mturk, qual1)
worker_id = "ABCDEFG1234567"
cohort_index = 3

worker_quals.assign_qualification_to_worker(
    mturk,
    worker_id,
    cohort_qual_id,
    integer_value=cohort_index
)
The method worker_quals.pass_list_of_workers() can also be useful if you are typically passing workers in batches. In addition to iterating over a list of multiple workers, this method protects against downgrading a qual, i.e., assigning a lower score to workers who already have a higher value for that qual.
Creating experiment batches
The power of using Python tools to create experiment batches is that you can create batches of many hundreds or thousands of images, which is not possible in the Mechanical Turk web user interface. It also allows you to automate the process of logging tasks to a database, enabling you to efficiently query for specific results later. Amazon Mechanical Turk does not support easy programmatic querying of tasks that were uploaded within the web user interface.
As noted earlier it is very helpful to have your experiment images stored on an Amazon server so that they display correctly and do not trigger any unexpected browser security behavior when embedded in a task. The mturksegutils submodule s3_manager provides tools for uploading different types of images to an Amazon S3 bucket.
To do this, first configure an S3 bucket on Amazon Web Services. It does not have to be the same Amazon account that you use for Mechanical Turk, though it helps. Importantly, ensure the S3 bucket is exclusively devoted to this experiment. This is because you will need to set the bucket to be totally public to avoid any unwanted security behavior when running your annotation tasks, meaning anyone on the web will be able to view the contents of the bucket.
Once you have set up the S3 bucket, mturksegutils.s3_manager has four methods that will be useful that you can incorporate into your own Python scripts:
s3_manager.upload_file_to_s3(file_dir, file_name, bucket) This takes an image (.jpg or .png) with the given file_name from the folder located at the path file_dir, and uploads it to the S3 bucket with name bucket. |
s3_manager.save_image_to_s3(nparray, bucket, s3_file_name) This takes the image from memory, stored as a numpy nparray, uploads it to the S3 bucket, and gives it the specified file_name. This is useful if you plan to programmatically modify your image set before posting them. |
s3_manager.upload_coco_image_to_s3(image_id, split, s3_buket_name) This takes an image from the coco dataset and uploads it to the S3 bucket with the name bucket_name. Specify the images image_id and which split of the dataset it came from (train, val, or test). This is useful for experimenting with coco images, a very large benchmark dataset commonly used in image segmentation research. |
s3_manager.set_bucket_public(bucket_name) This sets all the permissions for the bucket with bucket_name so that images from that bucket will display correctly in a Mechanical Turk image segmentation task. |
Once your images are uploaded to a public s3 bucket, you can use the mturksegutil’s hit_builder module to construct batches of image segmentation tasks with different properties. You will need to set the value of the variable html_task_path in mturk_seg_vars.py so that it points to the JavaScript image segmentation app. Once you’ve done that, you can use the method hi_builder.create_segmentation_batch to upload a new batch of images. This batch will be customized according to the experiment group data stored in your database, meaning with a few lines of code you can upload many images, all assigned to different cohorts and potentially with unique configurations of the labeling user interface.
The following code illustrates how to upload the first 1000 images from a given experiment group to Mechanical Turk. Under the hood, hit_builder will automatically cross reference the database to ensure each task has the appropriate drawing tools, class names, pre-annotations, and image URL. It will also ensure that the batch has the appropriate title, instructions, payment information, and other details specific to that experiment group.
Code sample 5: creating a batch of annotation tasks
import sqlite3
from mturksegutils import mturk_client, mturk_seg_vars, hit_builder


# Open a connection to the database and set up the Mechanical Turk client
conn = sqlite3.connect(mturk_seg_vars.db_path)
cursor = conn.cursor()
mturk = mturk_client.create_mturk_instance()

exp_group = "Cohort1"
start_index = 0
end_index = 1000
repeats = 3 # Each image should be repeated by 3 unique labelers

hit_builder.create_segmentation_batch(
    mturk,
    conn,
    cursor,
    exp_group,
    start_at=start_index,
    end_at=end_index,
    num_assignments_per_hit=repeats
)
Of course, you can also specify each hit individually. Though this is less common, it may be desirable in certain instances as programmatically generating a hit will make it easier to track in the database and retrieve data later. Here is a demo of how to do this:
Code sample 6: creating a single custom annotation task
import sqlite3
from mturksegutils import mturk_client, mturk_seg_vars, hit_builder, worker_quals


# Open a connection to the database and set up the Mechanical Turk client
conn = sqlite3.connect(mturk_seg_vars.db_path)
cursor = conn.cursor()
mturk = mturk_client.create_mturk_instance()

# Even for a 1-off, you will want to be able to search for it later
search_key = "1-off-task"

# Who is eligible to complete this task
required_training_score = 5
qual_requirements = worker_quals.get_task_qualification_set(
    mturk,
    qual_criteria=required_training_score,
    invite_only=False
)

# Import the code for javascript segmentation app
app = hit_builder.load_html_as_mturk_question(mturk_seg_vars.html_task_path)

# Data for customizing the task
image_url = "https://web.address.to.image.com"
obj_classes = "car-truck-bus" # The classes the labeler should mark
annotation_mode = "outline" # Which drawing tool(s) will be present
payment_amt = 0.08 # How much the labeler will be paid
time_limit = 600 # How much time the labeler has to finish (10 min)
repeats = 5 # Each image should be repeated by 5 unique labelers

hit_builder.create_segmentation_hit(
    mturk,
    conn,
    cursor,
    img_url=image_url,
    classes=obj_classes,
    annotation_mode=annotation_mode,
    exp_group=search_key,
    reward=payment_amt,
    time_limit=time_limit,
    qualification_requirements=qual_requirements,
    max_assignments=repeats
)
Managing results
Finally, Python tools can vastly reduce the time and effort needed to process experiment results, especially when your dataset involves thousands of labeled images. The mturksegutils submodule assignment_manager includes several common functions for handling the Mechanical Turk segmentation result data.
Usually, the first operation you will want to do after posting your experiment batch is to pull result data as it comes in. The method assignment_manager.sync_hits_to_db(exp_group) will check all outstanding labeling tasks for the given experiment group, pull any annotation data that was provided, and update the database. The corresponding method pull_training_task_assignments_to_db() will pull those tasks specifically labeled as training and update the associated data structures.
Once results are pulled, you may want to review the data before approving the work. It is very important that workers understand their results will be reviewed for quality, or it can induce them to take shortcuts or even try to subvert the task by submitting empty or nonsense annotations. One way to accomplish this is to intersperse training tasks, where all of a worker’s results are carefully reviewed to ensure they are maintaining quality. Another way is to review each annotation that comes in and approve or reject according to some pre-defined standards. mturk-segmentation-toolkit provides mechanisms for doing both of these.
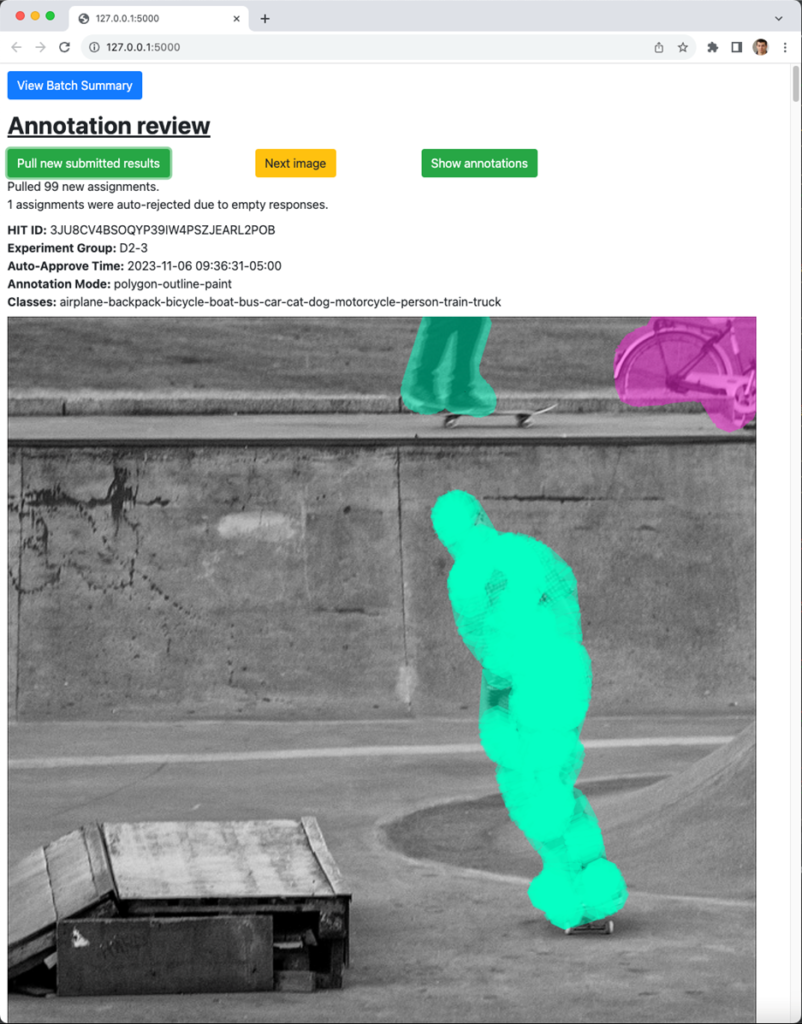
All data can be reviewed using the mturksegreview Flask application. The app has two main features: a batch summary page, showing you the status of each experiment cohort (Figure 9), and a review tool that lets you evaluate individual annotations and approve or reject the work based on the observed quality (Figure 10).
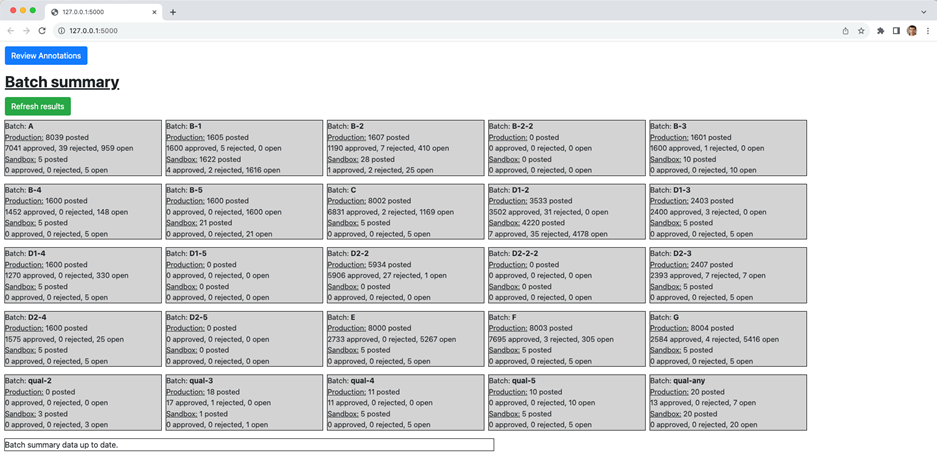
The batch summary shows the number of images for each cohort that have been submitted, approved, rejected, or are still waiting to be annotated. The review app pulls up each image, ordered by those that will expire soonest, and provides a keyboard interface for approving or rejecting. Different types of rejections will give different types of feedback to the worker. For example, you can reject with default reasons such as the annotation was too inaccurate, empty, or the worker missed too many objects, or you can define your own standards and feedback.
The review app also allows you to pull in training tasks specifically. Here, you can mark quality assessments that update the database, but do not affect the approval or rejection. It is good practice to always approve training tasks, even when low quality, but to restrict low performing workers from accessing the main experiment tasks.
If you are annotating data at a very rapid rate, it may still be infeasible to review individual annotations by hand. mturksegutils.assignment_manager provides several built-in methods for approving or rejecting based on heuristics. Below is an overview of the built-in methods, which handle many common image segmentation scenarios.
assignment_manager.approve_all_submitted_training_tasks() Approves all submitted tasks that are labeled as training. |
assignment_manager.auto_approve_if_has_multiple_annotations(exp_group) Auto approves any assignment for that experiment group where the labeler started annotating at least two distinct objects. |
assignment_manager.auto_approve_if_has_multiple_classes(exp_group) Auto approves any assignment for that experiment group where the label annotated at least two objects and assigned them different classes. |
assignment_manager.reject_empty_responses(exp_group) Auto rejects any assignment where the labeler did not start an annotation, or submitted annotations that lack any drawing data. |
Assignment_manager.update_status_for_approved_and_rejected_hits() Checks the database for any assignments labeled as ‘submitted’, but which have been auto-approved or auto-rejected by Mechanical Turk since the app was last run, and then updates the database to reflect the current status for those assignments. |
A useful feature is that by default, assignment_manager will automatically repost rejected tasks (this behavior can be turned off), meaning there is no delay or manual effort required to repost images that failed to get a satisfactory annotation.
It is also straightforward to define your own functions for auto-approving or auto-rejecting assignments. You can do this by writing your own Python methods that invoke assignment_manager.approve_assignment() or assignment_manager.reject_and_repost_assignment() and apply those operations to criteria and feedback you specify.
Finally, assignment_manager provides other functionality, such as overriding lists of rejected HITs, interpreting annotation result data as JSON objects, and removing assignments from Mechanical Turk early.
Part 6: Conclusion
Overall mturk-segmentation-toolkit provides a valuable set of resources for running image segmentation experiments on Amazon Mechanical Turk. mturk-sementation-toolkit includes a Javascript segmentation app that can be embedded directly within Mechanical Turk, along with an example screening task with an informed consent form. Additionally, it includes two Python packages, mturksegutils and mturksegreview which significantly accelerate the process of posting and managing image segmentation experiments, especially when they involve extremely large datasets or complex annotation schemes.
- Categories: